
Quick Fences for Any Era

 Last week I put together a few fences that I wanted to use as line of sight blockers in my Silver Bayonet game, but fences are pretty universal. They may not be particularly 'sci-fi', but I don't see why the future wouldn't have any wood fences! It was a very easy build, and I have taken pictures of each step to illustrate it here.


For this build I used a bit of mdf board as the basing, but some stiff cardboard will work as well. I also used to coffee stir sticks, and a square wooden rod. You could use a round dowel just as easily.


I roughly beveled the edges of the mdf pieces

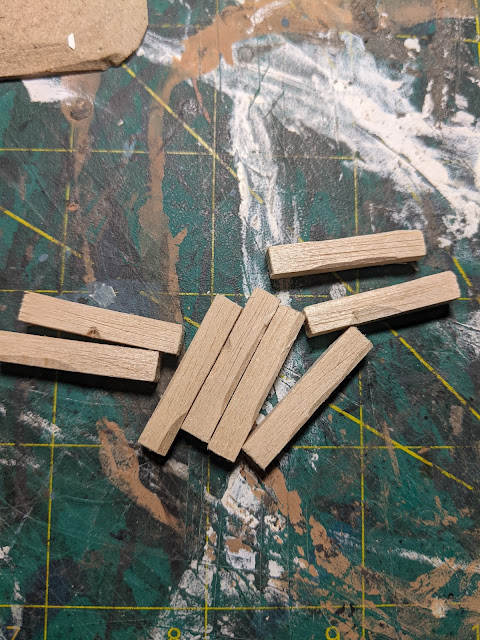
I cut the square wooden rod into 1 inch lengths. How many you need will depend on how long you want the fence to be. Mine are about 2 rods to one coffee stir stick. I also rough up the edges and cut little lines on the to give them a weathered look.


I glue the rods standing up on the mdf board, using the coffee stir stick to see the right width. You may notice that I have also clipped the round edges of the stir stick, to make it look more like a board.


I run an x-acto knife down the center very slowly, and cut the board into two board. If you have the thinner coffee stir sticks, you won't need to do this. I just find the wider ones look much bigger than a real plank.

Once the board is split, you will see that it still have one rounded edge. You will want to take your knife and flatten this out or give it a scuffed edge.
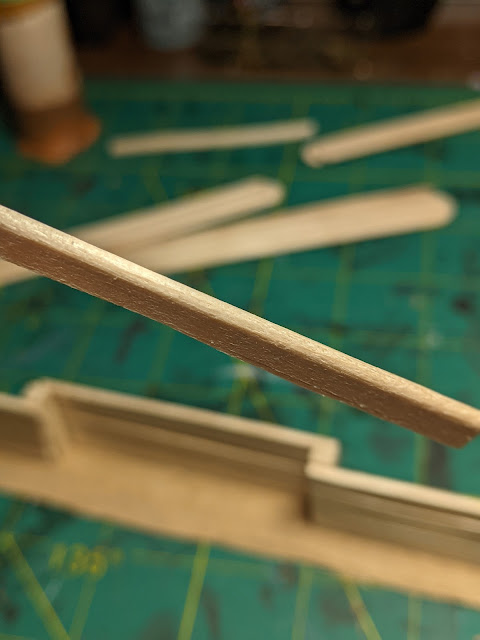
Much better.

Glue the bottom board to both poles, as well as a bit to the ground for stability. I use gel super glue, because it sets very quickly and I can keep working.

Attach board to the poles until you are near the top.

I made a few larger fences as well, just alternating sides for the boards to go on. The hard part is done, now we weather the wood!

You will want to texture the mdf bases. You can use white glue and sand, but I have a jar of texture paste, so I just apply this liberally.


Unfortunately, I missed a few steps with my photographs, but I can describe the steps quite easily. Once the texture paste is dry, use a black or brown wash and cover everything. This is what is going to colour the wood - not paint. Using your basic citadel or vallejo bottle of wash is not going to work well, because you will probably need like 2 whole pots. 
 
You can make yourself a large mason jar full of wash for about the same cost as one or two paint pots. There are plenty of videos on youtube about making your own wash, but here is the recipe:

8 parts water
1 part acrylic matte medium
1 part acrylic ink
1 drop of dish soap.

Easy.

Slop that stuff on your boards and let it dry.

I also use a few other inks directly on the wood to give a bit more colour, but this isn't necessary, and I wasn't even that happy with the extra colour.

Next, give your boards a very light drybrush with an off-white or ivory colour. and that's what you see below.
 
 
Next, you just want to add any flocking, tufts, static grass, or any other foliage or rubble to give a bit of colour and character. now you have nice sections of weathered wooden fence.


Comments

Popular posts from this blog

Miniature Makers: A (not at all) Definitive List

For nearly 20 years, I have been captivated by the miniature hobby. For most of that time, the only company I was truly aware of, was Games Workshop. The giant in the room, GW certainly has an impressive range of sculpts and a strong design vision. In the last few years, I have become aware of a wide range of other companies, brands, and sculptors, who have their own unique visions about what miniatures are. This will be a living list of the miniature manufacturers that have been recommended to me, or that I have purchased from. It is a very diverse list. Some manufacturers focus on their own proprietary games, and some just sell bits. I have not ordered from all of these companies, so your mileage may vary!!! If there is a company that you love, and it is not listed here, drop me a line and I will add it to the list. Pictured above - https://www.blacksunminiatures.co.uk/product/guardian/   * - Companies with a star were suggested by hobbyists on Reddit and throughout the community. Th

Rangers of Shadowdeep - Scenario 1: Ableheim

This is the first scenario I created for my Red Brothers campaign, and I had a blast creating and playing it. Since playing it I have made a few tweaks, and I'm sure you will have some creative tweaks as well! I love playing with randomized mechanics, especially when I am trying to create a narratively driven game. Setup: Ableheim is a town that houses corruption and cult activity, the warband has been sent to investigate and destroy any corruption they find. A mob gathers to watch the warband, getting increasingly agitated. Victory:  - Find and destroy the corruption; - Exit the table through the starting path Mechanics: Houses When a character investigates a house, roll a D6; If a 6 is rolled, that house contains the corruption. If no 6 is rolled, the corruption is in the last house. If a D6 roll fails, add +1 to the mob counter. When the corruption is found place 1 cultist, 1 cultist archer, and 1 demon in the house (or near it). Mob The mob consists of 3 villagers/militia model

Stargrave Loot Tokens

 I thought I would show off my Stargrave loot tokens. They are pretty simple, but I'm really happy with them. I followed the same method I used for my Frostgrave tokens, but I put a bit more effort into the data loot. Both sets were made from spare/old 40k bits. These data loot were made with bits of foam-core, foam insulation, a toothpick and some old eldar bits. The screen are just craft foam that I painted green, and then mixed that green with white to do the screen details. These terminals look good on the field! The physical loot tokens are super-duper simple. I probably could have put some more effort in here, but I wanted to get playing! These are just 3 pieces of 40k bits stuck to a base. Nothing fancy! I glued on some plastic plants that looked a little bit sci-fi to me.